Wednesday, September 24, 2008
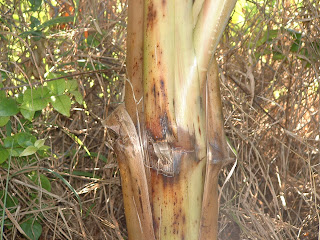
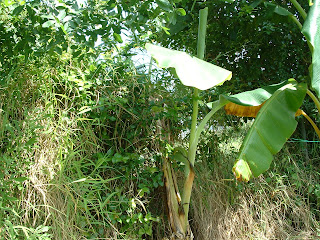
I couldn't have been more wrong. My folded over banana tree has turned into a double headed banana tree. Where the fold is in the trunk, a new head has emerged. The process reminds me of something from the movie aliens. I have taken some progression pictures of this two headed banana tree. I have never seen a two headed banana tree before so I don't know what to expect. Please enjoy the pictures.


I hope you were as amazed as I still am, see you next time.
Labels: banana trees, Double Headed Banana Tree
Monday, September 22, 2008
External Uses
1. sprains
2. warts
3. stings
4. bites
5. corns
Internal Uses
1. fever
2. chronic infection
3. varicose veins


I hope you found this post useful, see you again next time.
Disclaimer: This post was designed to teach about herbs, wild herb conservation, historical uses and latest herb research. This information is presented for educational use only. It is not meant to diagnose, cure, treat or prevent any disease. Please discuss your health issues as well as herb and supplement use with your doctor.
Labels: Medicinal Monday, Medicinal Plants, Pot Marigold
Tuesday, September 16, 2008
In fact, the best time to water your lawn is during the early morning hours. There are a few reasons for this. Watering your lawn in the morning will spread the water more evenly because there is less wind blowing the water around. Also watering in the morning allows the grass all day to dry preventing mold, fungus and disease from forming during the night. The most obvious reason for NOT watering during the mid-day hours is to actually get some water in the ground. When you water your lawn in the middle of the day, most of the water evaporates before it soaks into the ground, wasting lots of water and your grass is not being fed causing stress.
So in closing, set your sprinkler system to water in the early morning to save water and actually feed your lawn. I hope you found this post helpful. See you next time.
Labels: Gardening tips, Tuesday Tips, Watering the Lawn
Tuesday, September 9, 2008
While I was surfing the world wide web the other day I came across some good information on composting that I thought would be perfect for Tuesday's Tips. Here are 5 easy steps to turn organic waste into rich compost :
1. What is composting?
Composting is the biological decomposition of organic wastes by bacteria, fungi, worms and other organisms under controlled conditions where oxygen is available.
De-composers are not much different than people in terms of their basic needs, so be sure to provide your microbes with all of the basics:
| FOOD - | Carbon and Nitrogen (Browns & Greens) | |
| WATER - | Moist, not soggy | |
| AIR - | Oxygen | |
| VOLUME - | 3' long x 3' high x 3' deep or 3-5 foot diameter by 3 feet high cylinder |
2. What can I compost?
You can compost anything that was a plant. All plant materials contain nitrogen and carbon. Materials high in nitrogen are called "greens", e.g. grass clippings, manure, and kitchen scraps. Materials high in carbon are called "browns", e.g. leaves, sawdust, and wood chips. Before adding materials to the compost bin, chip or shred items so they are no more than 2-3 inches long.
3. Where do I compost?
Most people compost in a bin, which in Florida may be located in the shade or partial sun. A bin is not necessary, but helps keep the materials contained nice and neat. Your bin can be cubed, approximately 3' x 3' x 3', or a 5' diameter hoop of hardware wire. Place equal volumes of greens and browns in the compost bin. You can layer the materials in the bin by alternating 3-4" layer of greens and 3-4" layer of browns. Or you may mix up greens and browns and place them in layers in the bin. Water the compost as you build the bin.
4. After I build the compost pile, then what?
The compost may heat up due to biological activity and will certainly settle as the materials decompose. To speed up the process turn the compost bin periodically. Turning means taking everything out of the bin and then putting it back. Try to move the materials from the outer sides to the center.
You may add more materials at any time. Bury food wastes in the center of the pile or cover with brown materials such as leaves. You can also start a new bin for handling additional materials.
5. When is compost ready to use?
The compost is finished composting and ready to use when it has a uniform look (like soil), dark color, small particle size, and "earthy" odor. Most of the materials you put in will no longer be recognizable. Use finished compost as a mulch, soil amendment, or potting soil.
I hope you found this post useful. See you again next time.
This information has come from Florida's Online Composting Center.
Labels: Composting, Tuesday Tips
Monday, September 8, 2008
The Marsh Mallow Plant cam grow up to 6 feet tall and should be spaced about 2 feet apart when planting. This plant likes sun to partial shade and requires regular watering. This is in fact the plant that marshmallows are made from.
Unlike the Aloe Vera, the leaves of the Marsh Mallow Plant are edible and commonly used in salads, some boil them them and some people fry them. Eating the leaves has been known to help out with cystitis and frequent urination.
Taking the root internally has been known to treat:
- peptic ulceration
- excess stomach acid
- inflammations and irritations of the urinary and respiratory mucous membranes
- gastritis
- coughing
- chest pains
Externally applying the root helps treat:
- muscle aches
- inflammation of the skin
- insect bites
- bruises
- splinters
- sprains

Thursday, September 4, 2008
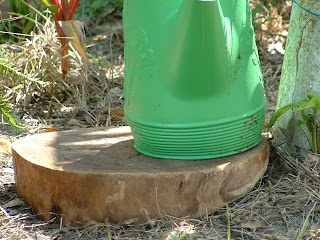
The other day one of my watering cans started leaking from the bottom. I almost threw it away when I thought of an idea. I will use it to contain my Passion Flower. Basically I will place a pot inside of the watering can. To start, I set a piece of wood on the ground next to my clothesline pole. This is a good barrier piece. Then I cut off the bottom of the leaky watering can. I set the bottom of the watering can on top of the wood piece. I then placed the pot of Passion Flower Vine on top of the bottom of the watering can. Now I have two barrier pieces. Then I placed the body of the watering can over the Passion Flower pot and feed the vine through the top. To finalize my project, I tied the vine to the pole using pieces of bread ties. Now I can have my Passion Flower Vine in my garden without worrying about it spreading, in theory.
I hope this works out. I will keep you updated on my Passion Flower Vine Project. Here are some pictures of my new project.


Labels: Passion Flower Vine, projects, Vines
Tuesday, September 2, 2008
Hello everyone and welcome to Tuesday Tips #3 - Mulching. Mulching is probably one of the most beneficial things you can do for your garden. If you have never considered mulching your garden in the past, maybe now is the time to reconsider.
Mulches are a labor saving device for all gardeners. Adding a layer of mulch will help to prevent the germination of many different weed seeds, dramatically reducing the need for cultivation or the use of any herbicides. Mulching your garden will also help to moderate the soil temperature and help to retain moisture during dry spells, reducing the need for watering. Mulching also protects the soil from the heavy impact of raindrops that can cause crusting.
While there are many types of mulch, organic mulches such as wood chips, grass clippings, or other locally available materials are best because they help improve the soil by actually adding organic matter back into the soil as they decompose. They may also encourage the growth of worms and other beneficial soil organisms that can help improve soil structure and the availability of nutrients for plants.
Mulching is also used to enhance your gardens appearance. Many of the bark mulches provide a uniformly rich brown color that contrasts with the plants. The mulch also helps keep plants clean by reducing the splash of soil onto leaves during rainstorms.
Here are a few things to take into consideration when choosing a mulch for your garden.
- What is your primary objective in using mulch? If you are most interested in weed control in a vegetable garden, a layer of newspaper covered with grass clippings or just grass clippings themselves will work pretty well. If you are finishing off a beautiful perennial garden in the front of your house, you may want to use something a little more attractive such as bark mulch.
- How long do you want the mulch to stay in place? If you are mulching around shrubs that will remain in place for many years, you might want to use some inorganic mulches such as brick chips, marble chips, or stone. These will not provide your garden with any organic matter to the soil, but they will be permanent. Remember that these are difficult to remove if you change your mind or want to add bulbs or perennials.
- How much money is in your budget? Mulching does not have to be expensive at all. In fact, some communities even offer chipped wood or compost to it's residents. You can use leaves, newspaper, and grass clippings which are all inexpensive mulches.
- How much mulch will you need? To really be effective, most organic mulches need to be piled on between 2 and 4 inches thick. So if your garden is a 10 feet by 10 feet garden mulched 3 inches deep then you will need 25 cubic feet of mulch.
Labels: Gardening tips, Mulching, Tuesday Tips


