


Monday, March 31, 2008
Sweet!! Just a little over a week ago I placed 12 Buddah Belly Bamboo ( Bambusa ventricosa ) seeds in incubator 9. I checked today and there are 3 sprouts! Two of the sprouts are about 1 inch tall and the third is just breaking ground. I potted the 2 that are an inch tall and put them in the shade. I can't wait to get these Buddah Belly's going, they look so cool when they are grown up. Here is a picture of my sprouts!! Click here for more information and pictures of Buddah Belly Bamboo.

Friday, March 28, 2008
Have you ever wandered what was happening in someone else's yard? I wonder all the time, what are they doing out there, how are they doing it, and why are they doing it? What drives other people to plant? These questions run through my head over and over while I am undergoing my projects. I now have answers to these questions.
I was wandering to much and going without answers for to long so I decided to do something about it. I started searching for other people's gardening blogs. This was taking me a lot of time and was very frustrating. Then finally I stumbled on this wonderful site called Blotanical. Here at Blotanical there are lots of gardening blogs all in one place to take out the guess work. It is a gardening blog directory with tons of extras! Ever since I joined the Blotanical community I feel that my gardening skills have been taken to a hole new level!
If you are like me and do a lot of wandering about what's going on out there then Blotanical is the right place for you too!! Look me up and say hey when you join us, I am LetsPlant with A Yard In Fort Pierce blog. Come and grow with us I will be expecting you, see you soon!!
Thursday, March 27, 2008
Today was a very, very good day!!! While I was out on my adventures for the day I guess I happen to turn my head at the right moment because I have been by here a million times and never seen it before but, there stood an amazing "click here for more info"Screw Pine ( Pandanas utilis ). I adore this tree and was especially ecstatic when I looked a little closer and saw that there were millions of seeds on it and the ground around it. I have never seen the seeds of a Screw Pine before. I think that when they are on the tree they look like large pine cones, and off the tree they look and feel like cows teeth. As I began collecting seeds off the ground , because I don't know if the cones were ripe or not, I noticed a little sprout!! I am sure you can imagine my excitement now!! But then I saw another one, and another one!! I pulled out my pocket knife and began digging them up! There were singles, doubles, and triple bangers that range from 1 inch to 6 inches! Here are some pictures of some of the sprouts, seeds and the first pictures are the mother tree!!


Wednesday, March 26, 2008
Today I started my water bottle irrigation project. This project is designed to save, save save! That's right it saves you money, saves the planet from waste, and saves trees from dehydration. It is another win, win situation!!
Let's start with saving you money, we all like that right! Well instead of going out and spending lots of money on an irrigation system, you should look around at what you already have and don't use anymore. I had a bucket full of water bottles sitting around waiting to be thrown away. Instead of throwing them away I decided to reuse them because I have already paid for them. These bottles are made of plastic so they will last forever, at my house or the dump, so I drilled 3 holes in each bottle cap. You can use more or less holes depending on how fast you want to release the water. Then I cut off the bottom's of the bottles. These bottoms can be used for something else to, I just haven't figured it out yet. If you have any ideas feel free to let me know! After screwing the caps with holes in them back on I decided where I would like to put them.
One of the reasons for this project is to save trees from dehydration. When you have a big tree that is surrounded by grass, or shrubs, or anything for that matter you are at risk of causing your tree great stress. This stress is caused from dehydration, though you think " but I water regularly, how could my tree be thirsty?" it very well could be. What happens is that the grass, shrubs or other plant life is probably drinking up all the water before it can reach the roots of the bigger tree. This is something that slips the mind very easily when planning a garden. To combat this problem you need to install a deep irrigation system that bypasses the roots of these smaller plants before releasing the water. It just so happens that water bottles are great for this!
I have taken my new deep water irrigation system to my fruit trees and installed them. I dug holes deep enough to leave about 1-1.5 inches of the bottle sticking up out of the ground. This is to prevent dirt from getting in the bottle. It is a good idea to use strategic placement and place them under leaves and branches of other plants so the runoff of water when it rains will fill the bottles more. As an added bonus I added fertilizer to the bottles filling them up about a quarter of the way. I fill the bottles up when I am watering and the are filled up by the rain. I will eventually have this system installed all over my yard, I just need to drink more water first.
When it is all said and done you can't beat it. You get satisfaction because you have installed your own deep water irrigation system all by yourself. You have saved a ton of money, and not by switching any policy's around! And let's not forget that you have done something to save the environment and it wasn't even hard, and you didn't even have to go out of your way. If everyone used this system could you imagine the impact it would have on the environment, you could have 100 bottles or more in your yard and not even know it. If you multiply that by the number of yards in the world that's a lot of bottles. You get my drift, here are some pictures of my water bottle project! And if anyone has any ideas on some good uses for the bottoms don't forget to let me know!! Thanks!


Monday, March 24, 2008
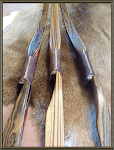
Today I decided to try my luck at the propagation technique known as air layering. I have an old Tangerine tree that I have made my test subject. I will walk you through the process that I used along with show you what I have done through pictures. First off what you will need to have handy are the following: clear plastic bag, black plastic bag, thin wire or tape or rubber bands, sphagnum moss, water, and a sharp knife. The first picture is of the branch that I have selected. This branch is about 3/4 to 1 inch thick, which is pretty much the ideal circumference when using the air layering technique. This branch is also at the top of the tangerine tree where it receives all of the light it possibly can, which is what you are looking for so it will produce rapid growth.
The second picture is of the injury. You must injure the tree to promote growth. With this in mind what I have done is cut all of the bark off the tree in a 3 inch area. I cut just deep enough into the tree to remove all of the green that backs the bark. If you leave this green part it will trigger the tree to reproduce more bark to heal itself, which is not what we want so remove all the green part to promote the production of roots.
The third picture is of the first wrapping, the clear bag. I placed a clear bag around the wound on the tangerine tree and secured tightly in place with a thin wire like a big garbage bag tie. Then I stuffed the clear bag full of moist sphagnum moss and sealed up the top the same way. Be sure to wring out the moss until there are no drips of water.
The forth picture is of the sealed up clear bag full of moist sphagnum moss.
The fifth picture is of the completed project. After I sealed up the the clear bag I wrapped it again with a black plastic bag. The reason for this is the black bag will block the sunlight to recreate natural light for roots which is darkness. I have used the clear and black bags so that I can remove the black bag now and again to see thru the clear bag to see results. If everything goes good in a couple of months I should see a root ball in the clear bag. Then I will cut the branch off the tree and plant it in a pot giving me a mature tangerine tree a whole lot quicker than growing one from seed!


Thursday, March 20, 2008
I was browsing through my local garden center when I stumbled upon a sign that said $5.00 plants. I started looking at all the plants and I spotted a Spindle Palm ( Hyophorbe verschaffeltii ). Score!! You just can't beat a $5.00 palm tree, no matter what kind it is. I am attracted to the triangle shaped trunk and bottle shaped base. The Spindle Palm is about 2.5 feet tall and I just re potted it into the pot you see in the picture. Here are the pictures of my new Spindle Palm!!


Wednesday, March 19, 2008
Well that does it!! I officially believe that I am doing something right! While checking my incubators and finding my first Travellers Palm sprout, and my first Bottle Palm sprouts I have come across the mother load!! When I removed the lid to incubator 4 I discovered 14 Hybrid Canary Date Palm ( Phoenix canariensis ) sprouts!! This Canary Date Palm produces a red fruit instead of a gold fruit, this is the only way to tell them apart. Now I am amped!! I have to say, today was a good day!!! Here are some pictures of the sprouts. The straws in the pictures are dividers. The pellets on the left side are seeds that I just put in the dirt as is. The seeds on the right are seeds that I made small incisions or scratches on the seeds.


While I was harvesting my first Travellers Palm sprout I also noticed that there were 2 Bottle Palm ( Hyophorbe lagenicaulis ) sprouts. At this point I am wondering if I am actually doing something right here. I can't wait to have a couple Bottle Palms around. Here are a couple pictures of the little sprouts. I only uploaded 1 picture because they were exactly the same.


Today when I checked my incubators I found sprouts!! My first Travelers Palm ( Ravenala madagascariensis ) sprout!! It has been a month and a half since I placed the seeds in the incubator. Not a bad germination rate if you ask me. I placed 20 seeds in the incubator so I am still waiting on 18 more. It is starting to get really exciting now that I am seeing some results. Here are some pictures of the new sprout.


I was outside watering the yard when I came up on one of my Frangie Pangie clippings. Wow,there was a huge beautiful yellow flower on it! I was so excited I ran in the house to get the camera and started a little photo shoot. I can't help myself when it comes to new growth, especially flowers on a clipping. Here are the pictures from the photo shoot, enjoy!!


Today I removed my Bambusa lako ( Black Bamboo ) seeds from the polystart mix I put them in yesterday and placed them into an incubator. The Bambusa lako or Black Bamboo is from Indonesia. Click here to see a full grown Black Bamboo. The Black Bamboo can grow over 40 ft. tall and stands up to hurricanes very well. The internodes of the Black Bamboo turn a glossy black. For now here are some pictures of the seeds.


Today I took my Bambusa ventricosa ( Buddah Belly Bamboo ) seeds out of the polystart mix I put them in yesterday and placed them into my incubator. And now we wait.
The Buddah Belly Bamboo is a very unique looking type of bamboo. The internodes are swollen in a way that it has an hourglass figure. This bamboo is classified as a grass and this grass can grow over 40 feet tall. The origin of the Buddah Belly Bamboo is Vietnam, Taiwan and Southern China. This Bamboo does best when planted in the ground in a pot. In order to achieve ventricosing you need to starve the plant of food and water, but it is well worth it as you can see. For now here are some pictures of my seeds. And here is a picture of a full grown Buddah Belly that is not mine, I found this picture on the internet.
The Buddah Belly Bamboo is a very unique looking type of bamboo. The internodes are swollen in a way that it has an hourglass figure. This bamboo is classified as a grass and this grass can grow over 40 feet tall. The origin of the Buddah Belly Bamboo is Vietnam, Taiwan and Southern China. This Bamboo does best when planted in the ground in a pot. In order to achieve ventricosing you need to starve the plant of food and water, but it is well worth it as you can see. For now here are some pictures of my seeds. And here is a picture of a full grown Buddah Belly that is not mine, I found this picture on the internet.


Subscribe to:
Posts (Atom)


