Tuesday, December 9, 2008
This weeks Tuesday Tip is about Winterizing the garden. Winterizing your garden is necessary for a healthy garden. So here are some tips on getting the job done.
Remove weeds, debris and invasive plants.
Fall is when weeds go to seed -- pods and seed cases burst open to release them. If you don't have time to rake up crab apples, try collecting them with a shop vacuum. If there's no time to pull plants up by the roots, chop or clip off their heads before the seeds are released. Discard all seed heads in the trash pile, not on the compost heap. If you have a large weed patch, solarize it through winter by covering it with a large sheet of black plastic weighted down by bricks or rocks.
Every once in a while, a garden plant finds the legs and begins to spread and take over the garden. By fall, it will have long worn out its welcome -- whether it's Japanese knotweed invading a shrub border or forget-me-nots running rampant through perennial beds. Dig or pull intruders out completely and dispose of them. Or spot treat them with an herbicide. Follow label precautions regarding when and how to spray. And be careful not to overspray and affect innocent plants nearby.
Prepping your soil to give plants a head start in spring is always a good idea.
After you have removed all of your garden debris, weeds and invasive plants, it's easy to prepare your beds for spring. There are advantages to testing the soil and amending it in fall. You'll have plenty of time to add needed amendments to the soil before cold weather sets in. The cool weather makes autumn a nice time to break new ground. Top beds off with a 3- or 4-inch layer of compost and leave it. Winter rains will leach nutrients into the soil to give your plants a head start in the spring, and when you prepare the soil, the topping will be easy to work into the soil at planting time.
Divide perennials now to ensure a trouble-free spring.
Fall is a very good time to divide perennials for gardeners in most parts of the U.S. The plants are going dormant at this time and won't be shocked by cutting, chopping or transplanting. And the weather conditions are congenial -- the soil is still warm and autumn rains will supply a steady supply of water to the transplants. In the spring, they'll repay your efforts with a fresh, vigorous start. Spring is better for division in freezing climates, where winter temperatures are hard on transplants.
How can you tell if a plant needs dividing? Many perennials benefit from division every three to five years. A clump of plants should be divided if it is not flowering as well as in the past, if bare spots are appearing in the center of the clump, if the plants in the clump flop over or if the plants spread to the point of becoming invasive.
Fertilize the lawn.
Fertilizing is generally not recommended for plants heading into the winter, because it causes new growth that can be damaged by cold. But lawns are an exception and should be fertilized in fall. If you live in a mild climate and your grass has just endured a long, hot summer, fertilize it in mid-fall. In cool regions, fertilize in late summer or early fall with a lawn fertilizer especially made for fall fertilizing. The bagged lawn food intended for fall use stimulates root growth, better enabling grass to withstand winter. It also lets the grass store food that will get it off to a good start next year.
Plant spring-blooming bulbs.
Autumn is the right time to plant hardy, spring-blooming bulbs. Don't put it off too late; if the ground gets drenched by rains or freezes, the project will be difficult or doomed. Buy large, firm bulbs and plant them at the depth recommended by the vendor for your area. A rule of thumb is to sink them to a depth of two or three times their diameter. If you have a problem with rodents digging up your bulbs, sprinkle gritty gravel into the planting hole or encase your bulbs in hardware cloth before planting. Straw is an attractive nesting material for rodents; don't use it as mulch around your bulbs.
Dig and store tender bulbs and corms.
In cold-climate areas, fall is the time to rescue the bulbs and corms of tender summer plants such as caladiums, cannas and dahlias, which will freeze and die if left in the ground over the winter. Dig them up as the foliage turns brown in early fall, trim off the remaining foliage or flower stalks, let them air dry for a week and then layer them in paper bags filled with peat moss or vermiculite. Store the bags in a cool, dark place, such as a basement or cool closet. If the storage area is humid, dust the bulbs with the organic fungicide sulfur before bagging them and slit the bags for better ventilation. Check the bulbs monthly; discard any that look soft and sprinkle water on those that look shriveled.
Water and protect vulnerable plants from winter stress.
Contrary to what you may think, winter dormancy is not always a blessing to garden plants. Frozen ground locks up water creating a drought situation which can injure or even kill plants. Be sure to give your plants, from perennials to trees, a good, long soaking before the soil freezes in late fall.
In cold climates where the ground freezes, using a heavy 4 to 8 inch organic mulch is wise -- mandatory in the case of plants of borderline hardiness. Winter mulch serves as a blanket, protecting the plants from freezing winds and frost-heaving, moderating soil temperatures and conserving moisture. If you get consistently deep snow cover, the need for mulch is less dire, but it's still a good idea to apply one after the first hard freeze. Also, it is a good practice to place some evergreen boughs or loose hay over low-growing plants, such as groundcovers, to protect them from snow damage without smothering them.
If your winters are bitter or if you have shrubs or roses of doubtful hardiness, there are a number of things you can do to protect them. Wrap them loosely in burlap, form hinged plywood sandwich-board tents over them or make a fence-wire cage around them and stuff it with dried leaves or straw. If your winter is windy, apply a waxy leaf coating, called an antidesiccant spray (available from garden centers and catalogs), as well as a burlap screen to evergreens. Antidesiccants have the added advantage of making evergreens less appetizing to deer.
Prep your tools for next year.
After the growing season ends, get your tools ready for next year by practicing the following:
- Clean your tools, using soapy water. To remove stubborn mulch, soak the tool and then scrub with a stiff wire brush.
- Rub off rust with very fine sandpaper or with fine steel wool dipped into kerosene.
- Dry the tools with an absorbent rag or paper towels. Dampness can lead to rust and spoil moving parts.
- Sharpen cutting edges with a file or a stone. File from the outer edge to the center. Use downward strokes; hold the file at an angle. If an edge is hopelessly dull, have it professionally sharpened.
- Wipe metal surfaces with an oiled cloth (vegetable oil is fine). Or store metal tool ends in a bucket filled with coarse sand soaked in motor oil.
- To keep wooden handles from drying out, apply a light coat of boiled linseed oil and buff.
- Tighten screws and dab a drop or two of light machine oil on moving parts.
Now you are ready to start fresh next year! Click Here To View The Rest Of My Tuesday Tips.
Labels: Tuesday Tips, Winterize
Wednesday, December 3, 2008

Labels: Heathcote Botanical Gardens
Saturday, November 29, 2008
This Piccabeen Palm in particular was about 20 feet tall and very healthy. They get the name King Palm because they can reach soaring heights of anywhere from 50 to 80 feet tall. They are native to South East Australia where they are considered a weed. These are fast growing Palms, growing at a rate of about 1-3 feet per year and germinate really fast too. These Palms are happiest in USDA zones 9-11. With the Bungalow Palm you have to water it regularly or it will look horrible. If watered regularly it will look amazing. The Piccabeen Palm Tree has bright green pinnate leaves about 8-10 feet long.
Here are some pictures of the mother tree that I harvested my seeds from.


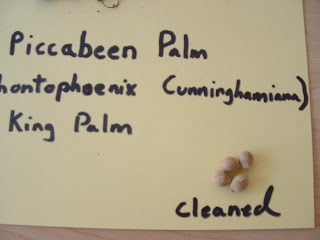
Here are pictures of my seeds. I harvested 28 seeds but only planted 22.


Labels: Palm Tree, Piccabeen Palm Tree, seeds
Monday, November 3, 2008
The flowers of German Chamomile are very aromatic and attract bees. To some people this plant may cause serious allergic reactions so use caution if you have allergies. German Chamomile has been used medicinally to treat digestive problems for a very long time. The effects of Chamomile as aromatherapy are soothing and calming, used in stress relief and aiding in sleep. The entire plant is used to treat common aches and pains like a toothache, or shoulder pain. You can also make a yummy tummy tea to help calm that upset stomach.
I do not have this wonderful plant in my collection yet, but here are some pictures I found on Google images.


I hope you found this Medicinal Monday useful. See you again next time!!
Labels: German Chamomile, Medicinal Monday, Medicinal Plants
Sunday, November 2, 2008
The Royal Poinciana Tree can grow to heights of 20-30 feet tall and should be spaced anywhere from 12-15 feet apart. The Royal Poinciana Tree enjoys full sun exposure and is drought tolerant making it ideal for xeriscaping.
The following are my pictures from seed pod to sprouts.
The following are pictures of Royal Poinciana seeds and seed pods.
These were taken 7-1-2008.


Labels: Royal Poinciana, Royal Poinciana w/Red Flowers, seeds, sprouts
Thursday, October 30, 2008
Back in January 2008 I received some seeds in the mail. I began germination on January 23, 2008 to be exact. I saw 2 sprouts on March 17, 2008. Only one survived. I have been babying this little guy for almost a year now and it is only about 5 inches tall.
The following picture is of the seeds which are located in the lower left corner.


Labels: Palm Trees, Ptychosperma waitianum, sprouts
Wednesday, October 8, 2008


Labels: crocodile fern, ferns
Saturday, October 4, 2008


Labels: Cypress Vine Project, Vines
Wednesday, September 24, 2008
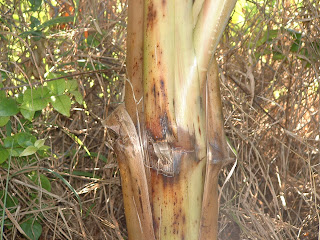
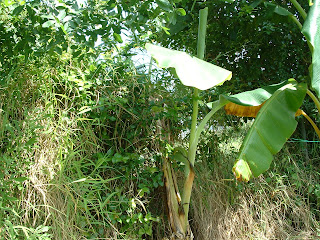
I couldn't have been more wrong. My folded over banana tree has turned into a double headed banana tree. Where the fold is in the trunk, a new head has emerged. The process reminds me of something from the movie aliens. I have taken some progression pictures of this two headed banana tree. I have never seen a two headed banana tree before so I don't know what to expect. Please enjoy the pictures.




I hope you were as amazed as I still am, see you next time.
Labels: banana trees, Double Headed Banana Tree
Monday, September 22, 2008
External Uses
1. sprains
2. warts
3. stings
4. bites
5. corns
Internal Uses
1. fever
2. chronic infection
3. varicose veins


I hope you found this post useful, see you again next time.
Disclaimer: This post was designed to teach about herbs, wild herb conservation, historical uses and latest herb research. This information is presented for educational use only. It is not meant to diagnose, cure, treat or prevent any disease. Please discuss your health issues as well as herb and supplement use with your doctor.
Labels: Medicinal Monday, Medicinal Plants, Pot Marigold
Tuesday, September 16, 2008
In fact, the best time to water your lawn is during the early morning hours. There are a few reasons for this. Watering your lawn in the morning will spread the water more evenly because there is less wind blowing the water around. Also watering in the morning allows the grass all day to dry preventing mold, fungus and disease from forming during the night. The most obvious reason for NOT watering during the mid-day hours is to actually get some water in the ground. When you water your lawn in the middle of the day, most of the water evaporates before it soaks into the ground, wasting lots of water and your grass is not being fed causing stress.
So in closing, set your sprinkler system to water in the early morning to save water and actually feed your lawn. I hope you found this post helpful. See you next time.
Labels: Gardening tips, Tuesday Tips, Watering the Lawn
Tuesday, September 9, 2008
While I was surfing the world wide web the other day I came across some good information on composting that I thought would be perfect for Tuesday's Tips. Here are 5 easy steps to turn organic waste into rich compost :
1. What is composting?
Composting is the biological decomposition of organic wastes by bacteria, fungi, worms and other organisms under controlled conditions where oxygen is available.
De-composers are not much different than people in terms of their basic needs, so be sure to provide your microbes with all of the basics:
| FOOD - | Carbon and Nitrogen (Browns & Greens) | |
| WATER - | Moist, not soggy | |
| AIR - | Oxygen | |
| VOLUME - | 3' long x 3' high x 3' deep or 3-5 foot diameter by 3 feet high cylinder |
2. What can I compost?
You can compost anything that was a plant. All plant materials contain nitrogen and carbon. Materials high in nitrogen are called "greens", e.g. grass clippings, manure, and kitchen scraps. Materials high in carbon are called "browns", e.g. leaves, sawdust, and wood chips. Before adding materials to the compost bin, chip or shred items so they are no more than 2-3 inches long.
3. Where do I compost?
Most people compost in a bin, which in Florida may be located in the shade or partial sun. A bin is not necessary, but helps keep the materials contained nice and neat. Your bin can be cubed, approximately 3' x 3' x 3', or a 5' diameter hoop of hardware wire. Place equal volumes of greens and browns in the compost bin. You can layer the materials in the bin by alternating 3-4" layer of greens and 3-4" layer of browns. Or you may mix up greens and browns and place them in layers in the bin. Water the compost as you build the bin.
4. After I build the compost pile, then what?
The compost may heat up due to biological activity and will certainly settle as the materials decompose. To speed up the process turn the compost bin periodically. Turning means taking everything out of the bin and then putting it back. Try to move the materials from the outer sides to the center.
You may add more materials at any time. Bury food wastes in the center of the pile or cover with brown materials such as leaves. You can also start a new bin for handling additional materials.
5. When is compost ready to use?
The compost is finished composting and ready to use when it has a uniform look (like soil), dark color, small particle size, and "earthy" odor. Most of the materials you put in will no longer be recognizable. Use finished compost as a mulch, soil amendment, or potting soil.
I hope you found this post useful. See you again next time.
This information has come from Florida's Online Composting Center.
Labels: Composting, Tuesday Tips
Monday, September 8, 2008
The Marsh Mallow Plant cam grow up to 6 feet tall and should be spaced about 2 feet apart when planting. This plant likes sun to partial shade and requires regular watering. This is in fact the plant that marshmallows are made from.
Unlike the Aloe Vera, the leaves of the Marsh Mallow Plant are edible and commonly used in salads, some boil them them and some people fry them. Eating the leaves has been known to help out with cystitis and frequent urination.
Taking the root internally has been known to treat:
- peptic ulceration
- excess stomach acid
- inflammations and irritations of the urinary and respiratory mucous membranes
- gastritis
- coughing
- chest pains
Externally applying the root helps treat:
- muscle aches
- inflammation of the skin
- insect bites
- bruises
- splinters
- sprains

Thursday, September 4, 2008
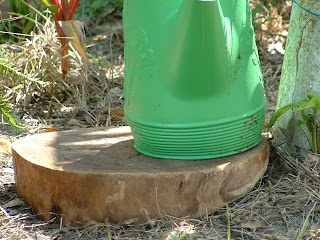
The other day one of my watering cans started leaking from the bottom. I almost threw it away when I thought of an idea. I will use it to contain my Passion Flower. Basically I will place a pot inside of the watering can. To start, I set a piece of wood on the ground next to my clothesline pole. This is a good barrier piece. Then I cut off the bottom of the leaky watering can. I set the bottom of the watering can on top of the wood piece. I then placed the pot of Passion Flower Vine on top of the bottom of the watering can. Now I have two barrier pieces. Then I placed the body of the watering can over the Passion Flower pot and feed the vine through the top. To finalize my project, I tied the vine to the pole using pieces of bread ties. Now I can have my Passion Flower Vine in my garden without worrying about it spreading, in theory.
I hope this works out. I will keep you updated on my Passion Flower Vine Project. Here are some pictures of my new project.




Labels: Passion Flower Vine, projects, Vines


